The Arrow exhaust available for the 2013-2017 Daytona 675 is currently a crazy good deal, so I picked one up and fitted it to my bike. By Kris Hodgson
Purchasing an aftermarket exhaust is normally a fun and rewarding experience on most motorcycles, assuming you don’t find yourself with something that doesn’t fit, or causes other unintended dramas, with a stern talking to from your local constabulary definitely not fitting into the ‘unintended’ category.
The standard exhaust with carbon-fibre covers from eBay and the EXUP removed
I’ve run a Taylor Made exhaust on my Daytona 675 R, but had some fuel/tune issues which meant putting the bike back to stock, and apart from removing the EXUP valve in the standard exhaust have been running the bike standard since. If you just want a little extra volume from your Daytona at lower rpm, this is a great mod and will just cost you the price of a Servobuddy or similar so you don’t get an error on the dash.
If you want a bit more bark however you’ll need to go for a slip-on system. On the bright side installation should be relatively easy, and you’ll save a heap of weight removing that hefty underbelly collector. The extra volume is a nice boon, but to be honest the biggest difference I notice is the weight saving and the effect this has on the Daytona’s handling.

The main reason I pulled the trigger on the Arrow exhaust from Triumph for the Daytona however? I was browsing the accessories section and noticed it was priced at just over $470, which is significantly cheaper than the old RRP. I gave my regular Triumph dealer, Northside Motorcycles a call to see whether this was right, and if it was to place an order.
As it turned out this was the correct price and it wasn’t long before I was able to pickup the system.
Here’s my thoughts on the system and below you’ll find a quick fitment guide.
The Arrow Exhaust fitted to the Daytona 675 R
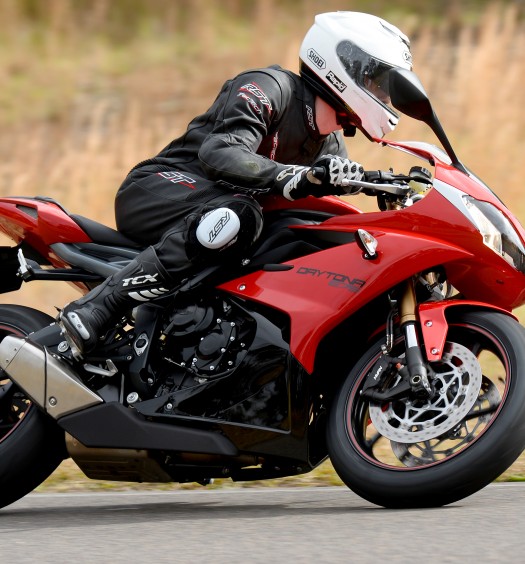
Arrow Slip-On Silencer Review – Daytona 675 R
As you’d expect the Arrow exhaust comes well packed and is extremely well made, with a cool matte carbon-fibre end-cone on the muffler. It doesn’t match the carbon-fibre front guard or fairing infill, but I’m not really worried. The muffler outer is also titanium, while the exhaust is E-Approved for noise and emissions, and does use the standard EXUP system. For $471.31 RRP it’s an absolute steal, and this does seem to be a discounted price. Signs of a Daytona 765 on its way, with the old 675 stock being cleared out, perhaps?
The EXUP valve basically restricts the exhaust until a certain rpm when it opens, and I wasn’t going to worry about adding it back onto the bike for this installation, so it was a slightly easier install and the exhaust is also louder at low rpm as a result. It has some real bark at low rpm, with a real crack on quickshifter upshifts and a great trumpet note. If you’re worried about noise or riding early or later in the day it might be worth retaining the EXUP.

At higher speeds, like on the highway that extra volume isn’t really noticed, although you do trade off some small amount of low end by the feels of it, for a stronger mid-range.
The exhaust also comes with all necessary fittings where they vary from those on the standard bike, with a new exhaust gasket which fits under the clamp. I was kind of hoping I’d get a new clamp included, as the old one has rusted up quite a bit, but it’s still working and did the job. Also included is a new stainless steel belly plate, as one mounting point is removed, which is required for fitment of the standard piece.
You can see how the eBay special carbon-fibre has not aged well (left), while the Triumph genuine (right) looks like new
This did mean removing the eBay special carbon-fibre panels which replaced the originals, and as you’ll see unlike the proper Triumph carbon-fibre, they haven’t aged well. That’s a good reason to purchase from a reputable manufacturer if you’re keeping your machine long term, there really is a big difference in quality. It’s not a major issue, but compared to the original it has obviously yellowed and the heat shielding wasn’t sufficient to prevent any damage.
As mentioned the weight saving is considerable, and the system looks considerably sexier if you ask me. Time to install was just over an hour without the EXUP and was a nice easy, simple job.
Also unlike back in 2013 when we fitted an Arrow exhaust to our ZX-636 there is a considerable increase in volume over the standard system, and that’s with the baffle in!
I would have said the system was a good buy if you wanted a quality exhaust at the original price, however for the currrent RRP this is a crazy good deal and well worth snapping up.
Arrow Slip-On Silencer Fitment – Daytona 675 R
![]()
Loosen the clamp that connects the collector and muffler to the headers.
![]()
Pull off the clamp and keep it somewhere safe, it’s re-used.
![]()
Undo the original exhaust mount bolts. Don’t lose the spacers or rubber grommets.
![]()
Note the rubber mounting and spacer. These are on both sides, so be sure you’ve undone both.
![]()
Also remove the mounting bolt off the rearset.
![]()
With all the bolts removed slide the exhaust off the mid-pipe. With no EXUP connected I didn’t need to do this step, however if you’ve still got it hooked up, look up instructions for removal. It’s an easy job but I don’t have the images to cover it in this article. I may be refitting it to see how the bottom end goes again however, so stay tuned for a fitment/removal guide.
![]()
Grab that shiny new exhaust out of the box.It’ll slide onto the mid-pipe (they don’t call it a slip-on for nothing), but first you need to add the new exhaust gasket for the clamp you previously set aside.
![]()
You may need a blade or screw driver to pry the old gasket out. Left is the new gasket.
![]()
Here’s the new gasket in place, with the sleeve it fits into. The clamp locks over this and tightens, but will only fit in one orientation, if it’s not fitting in place easily, you’ve got it wrong! How does it work you may ask? There’s a lip on the slip-on exhaust and it’s held against the gasket, creating a seal.
![]()
Line everything up, add the clamp and lightly tighten. You’ll do the full tighten after all other mounting bolts are in place. Also note how the sleeve, gasket and the lip on the Arrow exhausts pipe are all under the gasket. If the lip isn’t totally under the clamp you may need to turn the clamp over.
![]()
Fit the lower mounting bolt with the spacer and grommet. Don’t fully tighten.
![]()
Add the bolt to the upper mounting point off the rearset, with the appropriate spacer and grommet. Check the alignment and tighten fully, then go back down to the lower mount, fully tighten, then fully tighten the clamp at the mid-pipe.
![]()
Now pull the green contact off the Arrow badge and stand back and admire your handywork. Now double check the mounting and clamp bolts. Then the final step is adding the stainless steel lower belly plate, which replaces the standard item, as you’re now down a mounting point. I forgot to take a picture of this step, but it’s pretty straight forward. You can see the full range of Arrow by visiting the website here.


March 23, 2018
Hi would you happen to know the part number for the Arrow slip on, I can’t find it listed anywhere?
March 23, 2018
Hey Simon,
Here it is as listed on the Triumph Motorcycles Australia website for the Daytona 675 R – A9600442. Keep in mind this is the Arrow exhaust available through Triumph, which may be an exclusive deal they have, so they may not have the same exhaust available through Arrow stockists if you’re checking with them. Hope that helps!
August 1, 2018
Damn, saw this deal listed on their website last week.. went to buy it today and it’s been taken down. Called dealer, completely sold out.
August 4, 2018
Hey Tom, that’s no good! Maybe see if there’s any other retailers with them at that price, possibly online?
September 15, 2018
Fortunately was able to find a deal on one from a dealer in the UK, ended up at around $500 AUD including shipping. Absolutely love it, although might be a tad too loud without the baffle. The weight saving is definitely noticeable as well.
Cheers.
September 15, 2018
Hey Tom, that’s great news and a good price shipped!
September 15, 2018
Hey Tom, Good to hear that you were able to find an arrow fir the daytona 675r ,I was looking tk grab one , its not available anywhere in India , would you please post a link through where you got or any info would help .Thank you