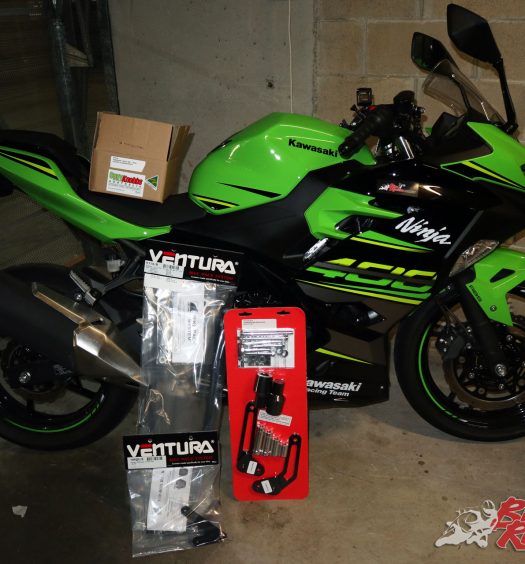
We've finally fitted our Project Ninja 400 with an aftermarket exhaust, choosing the Arrow Race Tech slip-on in 'Dark Aluminium' to match the KRT paint scheme and give a stealth look!
It’s been a bit quiet on the Project Ninja 400 front, despite the bike getting a run every weekend as Sam uses it for weekend duties and the occasional run up to Pie in the Sky, but we’ve finally picked an aftermarket exhaust – going with the Arrow Race Tech Dark aluminium option from Link International.
Here’s a full run down on fitment, and we’ll have a review up on the exhaust with sound comparison shortly. This is, as you’d expect of a slip-on exhaust, a really quick easy job. It’s as simple as a few bolts to remove the stock exhaust, then a couple of bolts and a bracket to fit the Arrow Race Tech item.
Grab your Arrow Race Tech slip-on, the instructions and all the necessary tools
The Arrow Race Tech slip-on exhaust is also road legal with the baffle in, which was a big selling point for me because commuting on a bike, I don’t want a smaller capacity machine barking away, it becomes a bit wearing when you’re doing an hour each way, each day. With the baffle when you want the extra noise you pull it out, and the rest of the time you’ve got a bit more note than stock, but well within reason.
All you’ll need for this job is a socket set (10/12mm heads), an Allen key or T-bar Allen set, a 10mm and 12mm spanner and a pair of scissors for trimming the rubber on the exhaust holder. The instructions provided are very… Italian, but it’s a simple job…
Ninja 400 Arrow Race Tech Dark Aluminium Slip-on exhaust fitment
The first step is grabbing all your tools and the Arrow exhaust out of the packaging. Make sure you’ve got everything laid out and take a look over the installation instructions. There’s a few points of note, namely how the exhaust bracket goes on, trimming the rubber gasket in it, and making sure the old mid-pipe clamp comes off, while the new clamp goes on – in the right orientation!
The first job is always to carefully unpack your new exhaust and give it a good ogle, perhaps have a trumpet on it and imagine how much more awesome your bike’s going to be shortly. Also read over the instructions, and get your tools ready.
Now to the actual work. Use an Allen key to remove the exhaust shield bolt, as well as the clamp onto the mid-pipe holding it in place (not to be confused with the the clamp holding the actual stock exhaust in place on the mid-pipe). Loosen the clamp, slide it down the mid-pipe, and the shield will come free.
Undo the single bolt on the stock exhaust shield
Also undo this clamp – the heat shield is captured underneath it by a tab (use a socket not a screw driver)
Now undo the mounting point at the pillion ‘peg hanger, and put this bolt, nut and washer aside, as it’ll be re-used for the Arrow install. The exhaust will now be just held on by the mid-pipe so avoid putting too much pressure on the muffler.
Undo the stock exhaust’s mounting point on the pillion hanger
Note the spacers on this mounting point, there’s one on each side. Leave them in and retain the bolt.
Finally undo the bolt for the standard muffler clamp onto the mid-pipe. The stock muffler should now slide off the mid-pipe easily. I removed the Arrow exhaust from the bubble-wrap sleeve it came in and placed it somewhere it wouldn’t get scratched and used this for the stock muffler. If I were to sell this bike, I’d put the stock exhaust back on and sell the Arrow separately. The same goes for the stock shield and clamp – pack it all away safely. You could probably even sell the stock exhaust for a small amount to someone who’s dropped their bike!
Undo the mid-pipe clamp for the standard exhaust and slide the muffler off
Now grab that shiny new Arrow Race Tech slip-on and slide it over the mid-pipe and take a look at where the exhaust hanger will be situated – keeping in mind there’s a bracket that’ll connect it to the pillion ‘peg hanger. Grab the Arrow slip-on off and double check the original clamp isn’t on the mid-pipe, then grab the new Arrow clamp and slide it on instead, making sure the tightening bolt is on the bottom (it’s less ugly this way).
Throw the new Arrow Race Tech exhaust on and eyeball where everything goes
Now grab the exhaust clamp and align the rubber and trim it back so there’s no excess. The rubber isn’t a perfect fit for the metal bracket, so I aligned it so the side that’ll be visible on the outside of the exhaust was properly aligned. Also remove the film that’s keeping the clamp metal clean.
The exhaust clamp comes with excess rubber that prevents it damaging the exhaust and helps it grip the muffler body, but needs trimming to size
Note the instruction for the clamp about trimming back the excess rubber
I used the metal lubricant provided on the exhaust and mid-pipe, but way over-did it here. I’ve since been told unless it’s a really tight fit and won’t slide into place, it should be unnecessary. To avoid almost knocking yourself out with the fumes first ride, use a minimal amount, or do without.
The anti-seize is important, if you need to disassemble in the future it saves a lot of pain!
This is the stuff…
Now slide the Arrow Race Tech muffler into place, with the clamp on the mid-pipe in the right orientation and the exhaust clamp roughly in place. Using the original pillion hanger mount nut and bolt, connect the provided black bracket. Install in the orientation shown in the picture, but DON’T tighten.
Now you’ll need to connect the exhaust clamp onto the black bracket, adding the small U shaped piece of the metal to the side facing away from the bike, with the provided nut and bolt. Again don’t tighten anything up.
See here the black bracket mounted to the pillion peg hanger, as well as the exhaust clamp
Note the correct mounting method (left in picture) compared to the incorrect method (right).
Note the correct way to mount the exhaust clamp for a secure fit – you really don’t want the exhaust too loose, as this holds the whole system in place apart from at the headers
At this stage hopefully the mid-pipe clamp is ready to be slid into place and tightened up enough that it’s snug, so it’ll stay in place. Now before you tighten everything up, double check everything is aligned, and that you’ve got the bolt heads on the outside, nuts on the bike-side, and the clamp with the tightening bolt underneath the mid-pipe so it’s less visible.
Note the Arrow Race Tech provided clamp in the right orientation
Tighten everything up to spec, without over-tightening. It’s always worth – on a job like this – rechecking a few days later and then a week later, plus maybe a month, to make sure nothing comes loose with the running vibrations.
Now do a final tighten up of everything…
That’s both of the upper bolts…
And of course the mid-pipe/slip-on clamp
And here’s a look at the finished result. The Arrow Race Tech Dark Aluminium slip-on exhaust was the choice for me because it most closely matches the KRT Edition colours. I’ve also run Arrow exhausts on my Speed Triple and Daytona 675, while we also had one on our Long Term ZX-636 back in 2013, and know the quality is top notch.
The Arrow Race Tech Dark Aluminium slip-on on our Project Ninja 400
There’ll be a full review up shortly talking about the Arrow Race Tech slip-on exhaust, and we’ll do a comparison video as well, with the stock versus the Arrow with baffle and Arrow without baffle, so stay tuned!
The Arrow Race Tech Dark Aluminium slip-on on our Project Ninja 400
The Arrow Race Tech Dark Aluminium slip-on has a real stealthy look to it on the Ninja 400, even in KRT colours! What a winner.
Arrow exhausts are available from all good motorcycle stores, with prices varying by the specific exhaust chosen. Link International is the Australian importer of Arrow exhausts.
The Verdict | Project Ninja 400 Arrow Race Tech exhaust fitment
Easy!
The Arrow Race Tech Dark Aluminium slip-on on our Project Ninja 400